Overview
SUSE eDirectory uses XDASv2 to provide a common portable audit record for analysis and investigations. XDASv2 is installed by default for eDirectory versions 8.8.7 and above. This document provides instructions on porting theses records into the LT Auditor+ framework. XDASv2 is applicable only for the non-OES versions of eDirectory on SLES.
Prerequisites
- LT Auditor+ framework installed
- Non-OES eDirectory versions 8.8.7 and above on SLES servers
- XDASv2 modules on SLES Servers.
Setup Instructions
Collecting and reporting on XDASv2 data with LT Auditor+ requires the following actions:
- Download the LT Auditor+ XDAS-EDIR update from http://bldownloads.blob.core.windows.net/release/EDIR.zip
- Download the LT Auditor+ Network Devices module from the https://bluelance.com/downloads page and follow instructions provided to install the LT Auditor+ Syslog processor module
- Setup the LT Auditor+ Syslog module to receive data from XDASv2 SLES servers
- Configure LT Auditor+ to collect and record XDASv2 data to the LT Auditor+ database
- Configure XDASv2 on non-OES eDirectory SLES servers
- Configure XDASv2 audit settings using iManager
- Report on XDASv2 data using the LT Auditor+ Report Generator
Setup LT Auditor+ Syslog module to receive data from XDASv2 SLES Servers
- Follow instructions to install the Syslog Kiwi module provided with the LT Auditor+ Network Devices module.
- Apply the License key for the Syslog Kiwi module.
- Extract EDIR.zip and copy contents of the folder EDIR\Syslog Server to the \Program Files\Blue Lance Inc.\LT Auditor+\Syslog Devices Service\Config folder
- On the Kiwi Syslog server import the XDAS Syslog Server Settings from the folder \Program Files\Blue Lance Inc.\LT Auditor+\Syslog Devices Service\Config
- Reconfigure and test connection to the LTASyslogDB database. (Instruction provided in the LT Auditor+ for Network Devices download)
Configure LT Auditor+ to collect and record XDASv2 data in the LT Auditor+ database
- Run the script SQL_EDIR_UPDATE.SQL on the LT Auditor+ production database. This will add the necessary XDAS operations to Syslog Devices Group.
- Launch the LT Auditor+ Management Console and perform the following actions
a. Click Options->Syslog Rule->Master Settings->Host Type and Host to bring up the following window:

b. Click on the Host Type EDIR-XDAS and enter the Host IP address and Host Name for all SLES servers to be audited using XDAS. Click Close to save.
c. If the windows machine hosting the LT Auditor+ Syslog processor is NOT an agent in the Syslog Devices Group, click Options->Syslog Rule->Rule Settings to bring up the following screen:
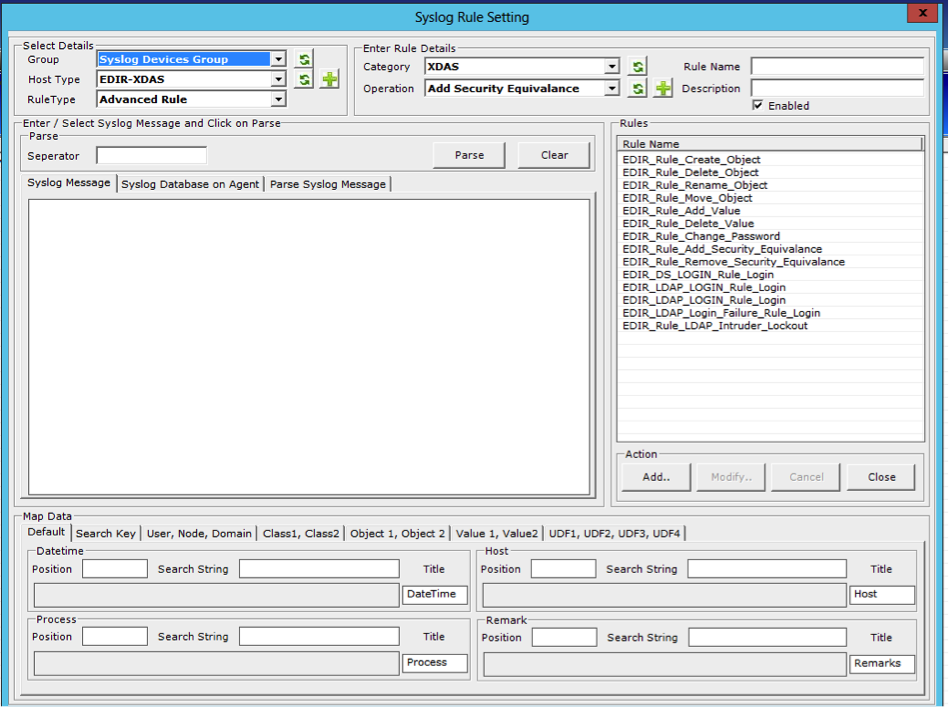
d. Select Group: Syslog Devices Group and Host Type: EDIR-XDAS
e. Right click on the Rule Name section and click on Copy Rules to Group to bring up
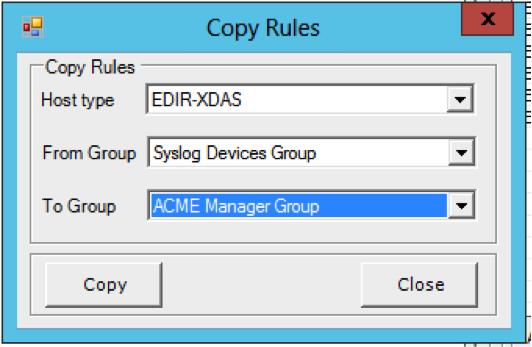
f. Select the target group that contain the Syslog Processor agent machine (in this case the local Manager machine) and click Copy to copy the rules.
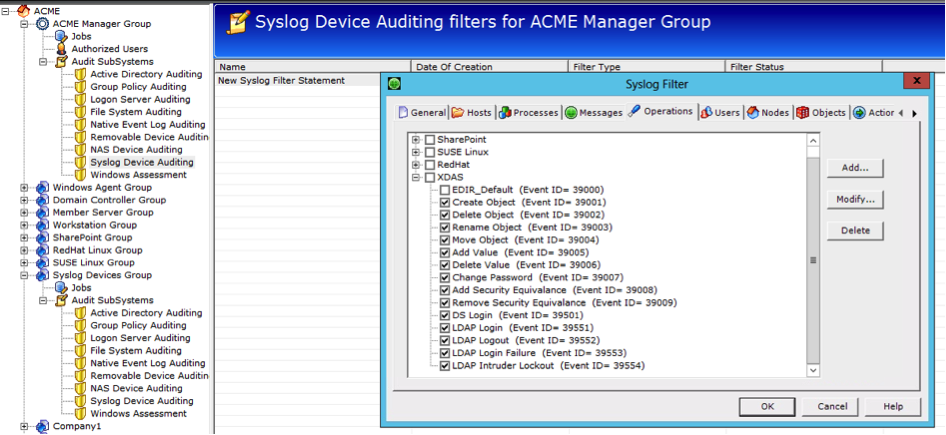
g. Under the Audit sub system for the target group create a new Syslog Filter statement with the following operations to complete the configuration on the LT Auditor+ Manager as shown:
Configure XDASv2 on a non-OES eDirectory SLES servers
-
- Ensure that XDASv2 has been installed by loading the module with the following command:
ndstrace –c “load xdasauditds” – If installed you either get a message stating that the module is loaded or already loaded. If the message is not found please contact your SLES server installer and get the XDAS modules installed.
-
- Access and open the file xdasconfig.properties located by default in the folder /etc/opt/novell/eDirectory/conf.
- Uncomment and modify the following lines in this configuration file:
log4j.rootLogger=debug, S
log4j.appender.S=org.apache.log4j.net.SyslogAppender
log4j.appender.S.Host=
log4j.appender.S.Port=514
log4j.appender.S.Protocol=UDP
log4j.appender.S.Threshold=INFO
log4j.appender.S.Facility=USER
log4j.appender.S.layout=org.apache.log4j.PatternLayout
log4j.appender.S.layout.ConversionPattern=%d{ISO08601} %c : %p%m%n
Note: The highlighted sections have been modified.
- Open the file (/etc/opt/novell/eDirectory/conf/ ndsmodules.conf and add the following line to auto start XDASv2.
xdasauditds auto #xdas this will auto load XDAS components when eDirectory starts up. - eDirectory services need to be restarted for changes to take effect and this can be done using the following command: /etc/init.d/ndsd restart
Configure XDASv2 audit settings using iManager
-
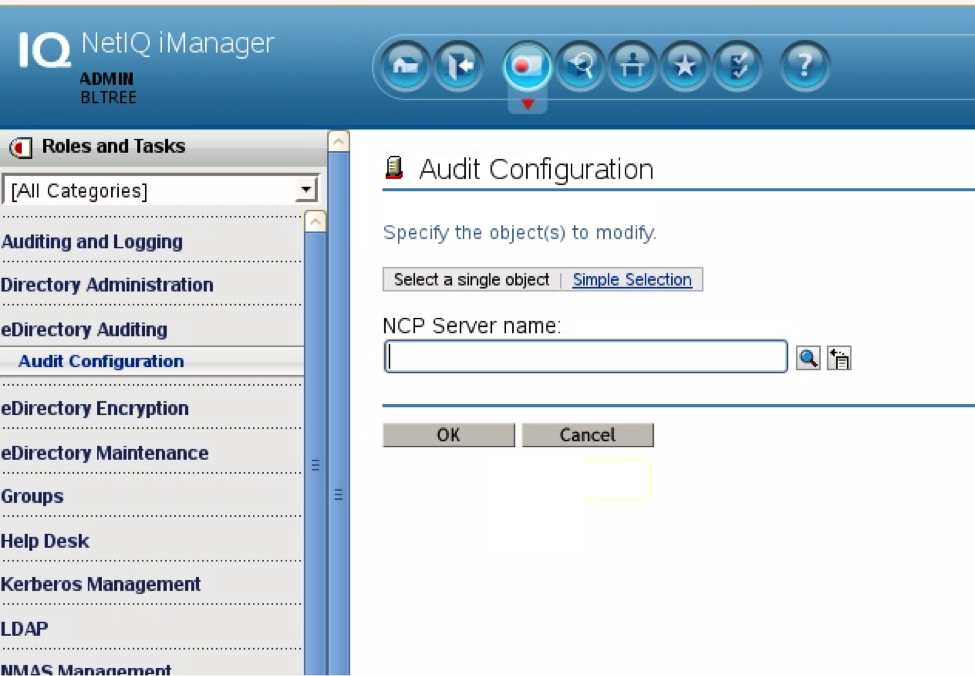
- Login to iManager and select eDirectory Auditing as shown below: (Note – ensure that you have the Novell Audit plugins to view this configuration setting)
-
- Select the All Account Management and Authentication events listed as shown below
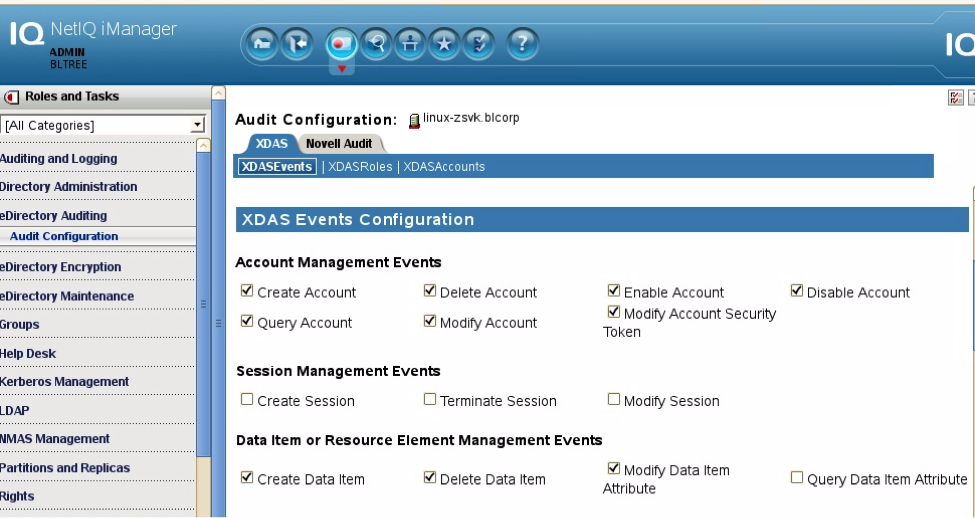
- Click Apply to save.
- Restart eDirectory on the SLES server for changes to take effect.
Report on XDASv2 data using the LT Auditor+ Report Generator
All reports can be generated under SUSE LINUX Reporting Arm. The data from OES and non-OES servers are merged and reported from a single source.